Secure Boot Protocol secure boot, based on special certified keys available only for Windows 8 and higher, will not allow you to install the system on your computer from any installation media other than media with "eight" or "ten". Therefore, to start installing another operating system on your desktop computer or laptop, you need to disable secure boot in UEFI BIOS.
Parameter "Secure Boot", responsible for disabling the secure boot protocol, in most cases is located in sections security, "System Configuration" or Boot. But I want to say that to install, for example, Windows 7 on a new laptop with UEFI BIOS just turn it off "Secure Boot" in UEFI BIOS, you must also enable compatibility mode for other operating systems. The parameter responsible for this is called by all manufacturers in different ways: Launch CSM, CMS Boot, "UEFI and Legacy OS", CMS OS. And it is located, in the vast majority, in the section "Advanced", and in it, in subsections boot mode or OS Mode Selection.
LAPTOP
Disable Secure Boot and UEFI on a Toshiba laptop
F2 and we enter UEFI BIOS. We go to the section security and finding the parameter "Secure Boot" "disabled". In such a simple way, we were able to disable secure boot in UEFI BIOS. But that's not all. Now we need to enable compatibility mode for other operating systems. Let's go to the section "Advanced" find subsection "System Configuration" and we go into it.
  Here we select the option boot mode or OS Mode Selection, and switch it from position "UEFI OS"(Maybe "UEFI Boot") to position CSM Boot(Maybe "UEFI and Legacy OS" or CMS OS).
 F10 Yes
Disable Secure Boot and UEFI on an HP laptop
Sometimes things aren't so obvious. For example, on some HP Pavillion notebook models, to disable secure boot a few more steps need to be taken.
Press the key when booting the laptop F10(Maybe ESC, then F10) and enter UEFI BIOS. We go to the section "System Configuration", find subsection Boot options and we go into it.  Finding the parameter "Secure Boot" "disabled". And the compatibility mode setting for other operating systems "Legacy Support", on the contrary, we switch to the position "Enabled".
 Responding to the warning Yes.
For the changes to take effect, click F10 and confirm saving the changes by selecting Yes. Reboot. After the reboot, a window appears with a warning "A change to the operating system secure boot mode is pending ...". In English, we are offered to enter the code 8721 on the laptop keyboard (in your case, the code, of course, will be different) and press Enter. After this change in settings UEFI BIOS will be saved and the laptop will reboot again.  When you turn on the HP laptop, press the key ESC and get into the start menu. In it we choose "F9 Boot Device Options" and, going into the boot menu, select the installation USB flash drive (already connected) or the installation DVD with the operating system.
Disable Secure Boot and UEFI on an Asus laptop
Aptio Setup Utility
Press the key when booting the laptop DELETE and we enter UEFI BIOS. We go to the section security and finding the parameter "Secure Boot", switch it to position "disabled". Then we go to the section Boot and finding the parameter "Fast Boot", switch it to position "disabled".
 For the changes to take effect, click F10 and confirm saving the changes by selecting . We go to the section Boot and finding the parameter Launch CSM, switch it to position "Enabled".
 Press again F10 and confirm saving the changes by selecting Yes. Reboot. When turning on the Asus laptop, press the key ESC and get into the boot menu. In it, select the installation USB flash drive (already connected) or the installation DVD with the operating system.
Disable Secure Boot and UEFI on a Samsung laptop
Aptio Setup Utility
Press the key when booting the laptop F2 and we enter UEFI BIOS. We go to the section Boot and find the parameter "Secure Boot". Switch it to position "disabled".
 On the warning that the computer may boot with an error, click Enter.
 In the same section, the option below will appear OS Mode Selection.
 Switch it to position CMS OS or "UEFI and Legacy OS".
 Again, a warning will appear about the possibility of the next boot of the laptop with an error. Click Enter. For the changes to take effect, click F10 and confirm saving the changes by selecting Yes. Reboot. Now we will be able to load any operating system on our laptop.
Disable Secure Boot and UEFI on an Acer Aspire laptop
InsydeH20 Setup Utility
Press the key when booting the laptop F2 and we enter UEFI BIOS. We go to the section Main and finding the parameter "F12 Boot Menu", switch it to position "Enabled". With this action, we allowed the appearance of the laptop boot menu when pressing the key F12. Now let's go to the section security and finding the parameter "Set Supervisor Password", press the key Enter. In the upper field, set the password (then we will reset it) and click Enter. In the lower field, enter the same password and click again. Enter.
 Enter.
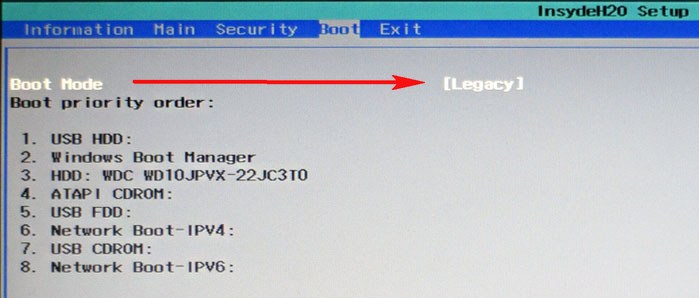
 Go to the section Boot and finding the parameter boot mode, switch it from position UEFI into position Legacy.
 For the changes to take effect, click F10 and confirm saving the changes by selecting Yes. Reboot. Since it makes sense to remove the password we previously set (the ability to disable / enable "Secure Boot" will remain), again F2 we enter UEFI BIOS, go to the section security and finding the parameter "Set Supervisor Password", press the key Enter. In the upper field, enter the password we previously set and click Enter. Do not enter anything in the second and third fields, just press Enter.
 Click on the message "Changes have been saved" again Enter. That's all! The password has been reset, and the ability to disable / enable "Secure Boot" preserved. For the changes to take effect, click F10 and confirm saving the changes by selecting Yes. Reboot. Now we will be able to load any operating system on our laptop.
STATIONARY COMPUTERS
Disable Secure Boot and UEFI on Asus motherboard
DELETE(Maybe F2) and enter UEFI BIOS. Click F7 to go to Advanced Mode. We go to the section Boot, find subsection "Secure Boot" and we go into it.
  Switching the parameter "Secure Boot" into position OtherOS.
 Returning to the root of the section Boot and go to subsection CSM (Compatibility Support Module).
 Switching the parameter Launch CSM into position "Enabled".
 In the additional options that open, select Boot Device Control and switch to position "Legacy OpROM only" or "UEFI and Legacy OpROM".
 Go to parameter Boot from Storage Devices and switch it to "Legacy OpROM first" or "Both, Legacy OpROM first".
 By doing this, we disabled secure boot and enable advanced boot mode. For the changes to take effect, click F10 and confirm saving the changes by selecting Yes
Disable Secure Boot and UEFI on Asrock motherboard
Press the key when booting the computer DELETE(Maybe F2) and enter UEFI BIOS. We go to the section security and finding the parameter "Secure Boot", switch it to position "disabled". For the changes to take effect, click F10 and confirm saving the changes by selecting Yes. Reboot. Now we will be able to load any operating system on our computer.
Disable Secure Boot and UEFI on a Gigabyte motherboard
Press the key when booting the computer DELETE and we enter UEFI BIOS. We go to the section "BIOS Features" and finding the parameter "Windows 8 Features", switch it to position OtherOS. Then the parameter Boot Mode Selection switch to position "Legacy Only" or UEFI and Legacy. And finally the parameter "Other PCI Device ROM Priority" switch to position "Legacy OpROM". For the changes to take effect, click F10 and confirm saving the changes by selecting Yes. Reboot. Now we will be able to load any operating system on our computer.
Disable Secure Boot and UEFI on MSI Motherboard
Press the key when booting the computer DELETE and we enter UEFI BIOS. We go to the section "SETTINGS", go to subsection Boot, and finding the parameter Boot Mode Select, switch it to position "Legacy+UEFI". For the changes to take effect, click F10 and confirm saving the changes by selecting Yes. Reboot. Now we will be able to load any operating system on our computer.
Hello everyone, today I will tell you how to disable Secure Boot. Secure boot is a UEFI feature that prevents unauthorized operating systems and software from running during computer startup. That is, Secure Boot is not a feature of Windows 8 or 8.1, but is only used by the operating system.
In some cases, it becomes necessary to disable Secure Boot in UEFI (hardware setup software, currently used instead of BIOS on motherboards): for example, this function may interfere with booting from a USB flash drive or disk, when installing Windows 7, XP or Ubuntu and in other cases . One of the most common cases is the "Secure Boot not configured correctly" message on the Windows 8.1 desktop. How to disable this feature in different versions of the UEFI interface will be discussed in this article.
Step 1 - Go to UEFI Settings
In order to disable Secure Boot, you first need to go to the UEFI settings (go to BIOS) of your computer. There are two main ways to do this.
Method 1. If Windows 8.1 is installed on your computer, then you can go to the right panel in Settings - Change computer settings - Update and restore - Recovery and click the button Reload in special loading options. After that, select advanced options - UEFI software settings, the computer will reboot immediately into the required settings.
Method 2: When turning on the computer, press Delete (for desktop computers) or F2 (for laptops). I have indicated the commonly used key options, however, for some motherboards they may differ, as a rule, these keys are indicated on the initial screen when turned on.
Examples of disabling Secure Boot on different laptops and motherboards
Below are a few examples of disabling in different UEFI interfaces. These options are also used on most other motherboards that support this feature.
Asus motherboards and laptops
In order to disable Secure Boot on Asus hardware (its modern versions), in the UEFI settings, go to the Boot (Boot) tab - Secure Boot (Secure boot) and in the OS Type item (Operating system type) set "Other OS" (Other OS), then save the settings (F10 key).

On some variants of Asus motherboards, for the same purpose, go to the Security or Boot tab and set the Secure Boot option to Disabled.
Disabling Secure Boot on Acer
The Secure Boot item on Acer laptops is located on the Boot tab of BIOS settings (UEFI), but by default you cannot disable it (set it from Enabled to Disabled). On Acer desktop computers, the same feature is disabled in the Authentication section. (It is also possible to be in Advanced - System Configuration).
In order for this option to be changed (only for Acer laptops), on the Security tab, you need to set a password using Set Supervisor Password, and only then will disabling secure boot become available. Additionally, you may need to enable CSM boot mode or Legacy Mode instead of UEFI.

gigabyte
On some Gigabyte motherboards, disabling Secure Boot is available on the BIOS Features tab (BIOS settings).

To start the computer from a bootable flash drive (not UEFI), you will also need to enable CSM boot and the previous boot version (see screenshot).
More options
On most laptops and computers, you will see the same options for finding the desired option as in the paragraphs already listed. In some cases, some details may differ, for example, on some HP you need to go to System Configuration - Boot Options to find Secure Boot, but the essence does not change.
In certain situations, users may need to start a computer or laptop from a bootable USB flash drive. If it is created correctly, there should be no problems with this when Secure Boot is disabled on the computer. If this option is enabled, an unauthorized operating system cannot be started while the computer is booting. It can also cause problems with installing Windows.
What is Secure Boot
It is a mistake to think that Secure Boot is an option of the Windows operating system. This feature is related to UEFI, which is analogous to BIOS. The Windows operating system only uses this feature to further protect your computer from unwanted third-party actions - hacking, spontaneous launch of software or unlicensed applications.
You can disable Secure Boot on any computer. As an exception, you can select tablets running Windows 10.
How to know if Secure Boot is enabled on a computer
There are 3 main ways to determine if the Secure Boot feature is working on a computer:

How to disable Secure Boot
To disable Secure Boot, you need to go to the UEFI settings, they are also BIOS settings. You can do this in two ways:
- When you turn on the computer, before the operating system starts loading, press the Del (or F2) button to go to the BIOS. It is worth noting that on some motherboards (often in laptops) it may be necessary to press several buttons at once to enter the BIOS, for example, FN + F2. Most often, the screen indicates which buttons you need to press to go to the BIOS;
- If the computer has the Windows 8 or 8.1 operating system installed, you can get a panel on the right side of the screen, go through it to "Settings". Then select "Change PC settings". Click "Update and Recovery" - "Recovery", and then "Reboot", configuring in additional parameters that the reboot should occur in "UEFI Settings".
The second method should be resorted to in situations where the computer keyboard does not work until the operating system boots. This is often the case with wireless keyboards.
After you can enter UEFI, you need to act depending on which version of UEFI is installed on the computer. Below we will give examples of how to disable Secure Boot in the most common UEFI options.
HP motherboards and laptops
To disable Secure Boot on HP laptops, you need to go into the BIOS. Next, go to the "System Configuration" menu and select the "Boot Options" option from the list. Scroll through the list of actions to about the middle, where the "Secure Boot" option will be located. Click on it and select Disable in the pop-up window to disable the feature.

Dell Motherboards & Laptops
Dell in UEFI mode has provided a separate item specifically for setting Boot options. To disable Secure Boot, you need to go to this section, select "UEFI Boot" and switch the "Secure Boot" option to Disable mode.

Asus motherboards and laptops
To disable Secure Boot on Asus devices, you need to go to the "Boot" tab in UEFI, then select the "Secure Boot" option. Unlike many other BIOSes, here you will not need to disable the function, but set the "OS Type" option to the "Other OS" option.

Note: Above is the method for new models of Asus laptops and motherboards. In some modifications, you will need to go to the "Security" tab in UEFI, and set the "Secure Boot" parameter in it to Disable.
Acer motherboards and laptops
Notebook. To disable Secure Boot on an Acer laptop, go to the "Security" tab and select the "Set Supervisor Password" option. Next, you will need to come up with a password, after which additional options will become available, in particular, the ability to turn the “Secure Boot” function to the Disable position.

Motherboard. You can disable Secure Boot on an Acer motherboard in the "Authentication" section by selecting the Disable value for the corresponding option. If the motherboard is old enough, you should look for an option in the "Advanced" - "System Configuration" sections.
Gigabyte motherboards
The most modern version of UEFI is presented on Gigabyte motherboards. To disable Secure Boot in this shell, you need to go to the "BIOS Features" tab and translate the corresponding item to Disable or Disabled, depending on the localization.

On other motherboards and laptop models, the Secure Boot disable scheme is approximately the same. It is important to note that before exiting the BIOS, do not forget to save the options so that the changes made are not reset.
Hello admin, the question is this, on a new laptop Acer Aspire V5 want install the Windows 7 operating system instead of Windows 8.1, I know that for this you need to disable the Secure Boot option in the BIOS and enable the Legacy advanced boot mode.
I act like this, insert the Windows 7 installation flash drive into the laptop and reboot, press F2 at boot and enter the UEFI BIOS, but the Secure Boot option is blurred (grayed out), that is, it is inactive, and it is not clear how to switch it to Legacy mode.My bootable flash drive is not showing up in BIOS.If you press F12 when loading the laptop and enter the boot menu, then the flash drive is also missing there.
Hi all! I want to reset my new Acer Aspire laptop to factory settings, but before doing that, I need to pull my files from the Windows 8.1 desktop, because restoring the factory configuration from the (C:) drive will delete everything. I boot a laptop from a flash drive that contains the Linux operating system, but there is no flash drive in the boot menu (F12). Your site says that you must first set the administrator password in the BIOS, then disable the Secure Boot option, and only then will it be possible to boot the laptop from a USB flash drive. All this is somehow tricky, do not tell me how to do it right?
How to disable Secure Boot on an Acer Aspire laptop. How to remove bios password on acer laptop
Hello friends! I want to dissuade the author of the first letter from replacing Windows 8.1 with Windows 7, in my opinion, the eight has not so many minuses, so that it’s so easy, at a time, to demolish it from a new laptop, but, as they say, the master is the master and the decision After you.
But the author of the second letter will have to disable Secure Boot, because most Linux distributions will not be able to pass the secure boot protocol! By the way, here is a good one, which Secure Boot will not be a hindrance.
By pressing a key F2 when booting, go to BIOS UEFI, go to the tab Main, set the option F12 Boot Menu in Enabled, with this action we allow the appearance of the laptop boot menu when the F12 key is pressed.

Next, go to the tab Security, go down to the option Set Supervisor Password and press the Enter key, enter the password in the upper field (then we will reset it) and press enter, In the lower field, enter the same password and click again Enter. per message


Now let's go to the tab. Boot. Selecting an option boot mode(is in position UEFI) , choose Legacy
and confirm the choice. 

We remove the BIOS password for the Acer laptop, the ability to disable / enable Secure Boot remains
There is one unpleasant moment in this whole story, if you suddenly want to get into the BIOS of a laptop, then you will have to enter an invented password,

as they say, nafik is necessary, because it can be forgotten.
We enter the BIOS, go to the tab Security , go down to the option Set Supervisor Password and press the Enter key, in the first field we enter the password we have invented, and press Enter.


a message comes out
Changes have been saved (changes are saved), confirm.
That's it, the password has been reset.
We press the F10 key to save the settings and reboot, the ability to disable / enable Secure Boot remains.
UEFI or secure boot- This is a standard BIOS protection that limits the ability to run USB media as a boot disk. This security protocol can be found on computers running Windows 8 and newer. Its essence is to prevent the user from booting from the installer of Windows 7 and below (or an operating system from another family).
This feature can be useful for the corporate segment, as it helps prevent unauthorized booting of the computer from unauthorized media that may contain various malware and spyware.
For ordinary PC users, this feature is useless, on the contrary, in some cases it can even interfere, for example, if you want to install Linux along with Windows. Also, due to problems with the UEFI settings, an error message may pop up while working in the operating system.
To find out if you have this protection enabled, it is not necessary to go to the BIOS and look for information about this, just follow a few simple steps without leaving Windows:

Depending on the motherboard manufacturer, the process for disabling this feature may look different. Consider options for the most popular manufacturers of motherboards and computers.
Method 1: For ASUS

Method 2: For HP

Method 3: For Toshiba and Lenovo
Here, after entering the BIOS, you need to select the partition security. There should be an option "Secure Boot", against which you want to set the value Disable.

Method 4: For Acer
If everything was relatively simple with previous manufacturers, then the initially required parameter will not be available for making changes. To unlock it, you will need to put a password on the BIOS. You can do this with the following instructions:


